So I was looking at all the lovely colors of Lopi, thinking how great they would be if they could turn themselves into a felted bag, and lo and behold, Designs by Shelley had a great bag pattern. It's called "Flower Power Bag" and featured a multi colored bag with flowers attached to the pocket. You knit the bottom of the bag in one color, the two sides in contrasting colors, then knit and attach the front pocket and straps and voila! It's ready to felt! It knitted very quickly and I worked on it at the shop, since I work on Thursday evenings for the time being and Friday afternoons can be a bit slow during the summer.
Here's a picture of the bag pattern from Designs by Shelley:

You can see the other Designs by Shelley bags at her website http://saboardman.tripod.com
and order them from Nease's Needlework. Call or come by the shop to pick out your favorite (shameless plug!).
I modified the colors a little bit, since I didn't have Lopi in yellow and I wasn't sure how Brown Sheep's Lamb's Pride Bulky would felt on a Lopi bag, so I decided to use 2 shades of rose for the sides (which are picked up and worked in stockinette stitch from each long edge of the purse bottom), and the navy that I used on the bottom is the pocket color. I used green for the top, which is knit after the edges are sewn together, and for the handles. If you feel you need practice doing your mattress stitch to sew sides together, Lopi is big and bulky and easy to see! I know that Lopi is not everyone's favorite yarn to work with, especially in GA's 90+ degree temperatures, but in the shop in the air conditioning, it wasn't so bad. The front table held the bag while I worked on it which helped with the weight of it since it wasn't sitting on my lap as I knitted.
And a word about the handles - I fully expected they'd be knit as I-cords but they weren't. They were a 5 stitch stockinette stitch that you knit for 20 inches and thank goodness I remembered how to knit backwards. I had learned that technique years ago when I learned entrelac, as it makes the work go more quickly since you're not turning the work from back to front on a limited number of stitches (10 or less). So I guess the designer (Shelley) wanted flat handles for the bag rather than small round ones. And you know, it makes sense: felted bags can be heavy and I'd much prefer having a flat handle that will fit easily on my shoulder, rather than a small round one that will dig in when I load the bag with items.
Anyway, since I've taken these pictures, I've finished the handles and sewn on the pocket. I'll take pictures of the completed bag in its unfelted state next week, after I've had a chance to catch my breath from the trip I'm taking this weekend with Webmaster Bill. I can measure it and show how large Lopi is before felting when knit on size 13 needles. Once it's felted, I'll probably use some scrap yarn and do some needle felting of flowers onto the front of the bag to fit in with the instructions (they do say "Flower Power," after all!).
So here are the pics:
 This is the front of the bag, and the side where the pocket goes. It took very little time to get this far - I started on a Saturday late afternoon, and knit on Thursday evenings if the shop is slow.
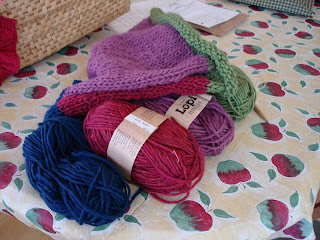
Here are the yarns I used:


What you may or may not be able to tell from your monitor is the shade of green I used. Those of you who know me well will know that this shade of green, AKA 70's green, is one of my least favorite shades in all of color-dom. My employees (most of whom who love this shade) took great joy in pointing out to me that everything old is new again; my thoughts are "but must this 70's green be new again, too???" It does go with the bright shades of rose, though, in a way that shows them off without their rosy-ness being too bright.

And yes, there is my side seam with my mattress stitch. A kind and knowledgeable knitting teacher taught me how to do this seam while we were enjoying a glass of wine and some chocolates at The Mountain retreat center, and I've never disliked seaming since. There just might be a lesson in there!
So hope you enjoy this posting, and I'll have more pics to put up in a week or so!

3 comments:
I want to learn how to backwards knit. You'll have to teach me!
Drop me an email and let me know how to post on here - I've got the Pursenalities bag nearly done and I'll put up some before/after felting pictures.
It's really cool - you have the completed purl row on your RH needle, then slip the tip of your LH needle into the first stitch and put the yarn over it. I'd really have to show you, though, cuz I'm not always sure how I'm doing it, either!
Post a Comment