Still Life from Quimper

Still Life from Quimper
A shot of an almost-completed still life needlepoint

Welcome to my Blog

So very happy you came to visit. Now, pull up a chair, pour a glass of your favorite beverage, and read on about adventures in needlework.

Friday, January 27, 2012

Some needlepoint since Christmas

Now that my Christmas knitting is done, shipped, and received, I can attend to some other projects. My little bird is still in good shape - have elongated one branch and am about to start with another pink flower. Progress! But really, stitching on linen is such a summertime project, one to stitch when the spring starts to come and the days grow longer and a nice early evening can be spent on the front porch with fabric, scissors, and cotton thread. And a nice glass of wine. Here's my little bird's progress:

He may receive some work in a couple of weekends
when I go to visit a stitching friend.


In the meantime, I noticed a green project bag that I knew contained some pieces of my late mother's needlepoint. I took a look and found two iris pieces that I knew she bought at my shop because I remember buying them from the sales rep. She had always liked pansies and violets, but these were truly beautiful pieces that I know she couldn't resist when I got to convincing her that she had to have them. The first one she had started . . . and then the yarn got separated from its project (thus motivating my plaintive plea in my last post to please, stitchers and knitters, please label your projects or provide a list of your colors, or at the very least, make sure everything is together in one bag. It makes going through your beloved projects so much more in keeping with your own wishes for your beloved projects)! Apparently, Mom had started stitching this piece, notice the Q-Snap frame holding it in place, and so it was up to me to find matching colors. Did I mention that I still have some Persian Yarn in my storage unit?!

While keeping an eye on what I "bought" from myself both for my poor accountant's sake and to keep my website current, I checked, brought home, stitched with, and went back (I think I started doing this activity in the summer, if the truth be told) to find a better match for the greens and the pinks. I did put it down when I couldn't find the exact shades of green for the leaves, but picked it up again earlier this month because, well, really, who's going to know? Except everyone who reads this blog, and really, it doesn't matter all that much. The ol' galloping horse and all! When I picked it up again I started stitching like a crazy woman, just wanting to finish this petal and that color, and all the while doing some background so that there is less background drudgery when our iris is complete:
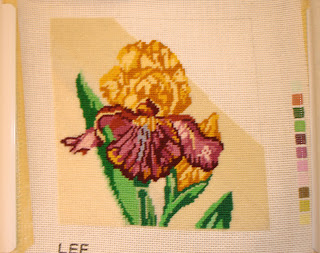
Mom stitched the far left-hand petal, that delicate pink part, and
the bottom part of the left-hand leaf. She had also
started the basketweave in the bottom left, and it took some
guesswork to find the correct color of yarn she used.

BTW, "Lee" is the name of the needlepoint designer/manufacturer. Lee's Needle Arts is a needlepoint company that had some beautiful needlepoint colors on their canvases that I always found luscious, and the canvases were also reasonably priced for hand-painted canvases. When I bought my shop, I wanted to bring in an alternative to the types of needlepoint my predecessor had always carried. So this was one of my new offerings to a whole new slew of customers, including my mother.

And on this picture is where my background color ran out.
Really, I'm quite proud of the progress on my background - there were a lot of places to fill in and join in a continuous, smooth angle. The background is stitched in a basketweave pattern, so called because the back of it looks like a woven basket. Literally. While it takes more yarn to complete and will help keep a monoweave canvas straight (with mono canvas, the individual strands are woven over and under one another, rather than through one another like an interlock or Penelope canvas), it also takes some "reading" of the canvas to know whether you should stitch up the angle or down it. If you get your stitching direction wrong, then it will show uneven-ness on the front, and the back will have two straight up-and-up rows instead of an up row and a sideways, woven row. But I geek out.

While NNW does not have the background color in stock, and the single importer and dye-er of said color has been in product backorder for almost two years on all of their Persian yarn, I think maybe, just maybe, I have found two little skeins that I can use to complete this project, finally. Then those completion endorphins can kick in and I can begin another project!

But wait, I already have started another project!

This one was not on a frame; in fact, Mom had not even started stitching it. I started stitching it without a frame and realized my wisdom over the shop-owning years in "suggesting" that a customer buy a frame when starting a needlepoint project. Not being on a frame already allowed me to buy one from myself (always an interesting financial transaction) and mount it. I gotta say, this style of frame is amazingly versatile for different sizes of needlepoint projects (I used part of it for my Swan piece) but it is holy h#(&ck to mount a piece of needlepoint onto it. It often took me, one of my minions, and the customer to firmly attach the needlepoint to one of these frames, and all the while avoiding the tiny little nails that hold your needlepoint on top and bottom. But again, I digress. Here is the already-started piece, and some progress has been made since last week:

Aren't these colors just extraordinary? The deep, rich blue
set off by an equally strong purple, and while the greens
have a little more yellow than I usually like, their shades kind of
fade into a supporting role against these strong purples tones.

Like I said, Mom had simply put the colors and the canvas (folded! oh noooo!) into a gallon-sized Ziploc bag and not even begun it. Which, if I die tomorrow, will be the case for me with some projects, I admit, but I hope to have many, many more good years of stitching. With this particular piece, I'm using longer "pulls" of yarn from the Persian than I normally do, in part because I am discovering as I stitch just how long a piece goes before I have to start another piece. The yarn is a good quality yarn, and it does not fray towards the end of the stitching. On the other hand, I can't use as much of the skeins of DMC yarn on my pull, as it is a single strand and is more loosely twisted than the individual strands of Persian. And again, I am stitching background (using tent stitch this time, as there are really no large stretches of background that would warrant using the basketweave) as I go, so that I don't stitch all the pretty parts and leave the dull, boring background to do. Someday. That's one of the advantages of working on a frame, too - you do a section, then you roll it to the next section, and just move on up the piece until you are done, pattern and background and all.

So that's it for this post. I will definitely show some progress on the second of the two iris pieces, and perhaps my background color will arrive in the next week or so. Which will leave the question, which do I stitch first??


Monday, January 16, 2012

Much has Happened Since Last We Met

That sounds so very Victorian, doesn't it? I just finished typing up some passages from Hard Times by Charles Dickens and Nightingales by Gillian Gill (the latter a biography of the Nightingale family and how it all led to Florence Nightingale's extraordinary life) and these Victorian thoughts just tickle their way into my creative writing day today.

Obviously, I wrote my last entry over the Thanksgiving weekend, a weekend I spent enjoying my last few weeks with my large, round, grey cat. I had received word in mid-November that her enlarged heart had now morphed into heart failure proper (cardio myopathy), and all of the months of medicating her with Plavix (yes, you read that right), Atenatol (to slow down her rapidly beating heart) and Methemazol (to control her hyperthyroidism) were going to come to an end. And she was an incredibly good patient - she did not try to claw your pill-holding hand out of her mouth, she just did everything she could to walk away from whatever you had popped into her mouth as quickly as she could, and there were times when I found little bits of pill in different places in the house. I was relieved that, if she had to become so ill, it was during a time when I had the monetary funds to buy all this medication for her (Plavix!! Jeez!). Strangely enough, I felt myself hearken back to my Quaker college days and "bear witness" to the uses of modern medications for one's feline off-spring. The last time I went to the pharmacist, there was a woman buying meds for her dog, so I didn't feel so out of place.

Still, that's a lot of stress for a cat and her owner to go through with all those meds and schedules. While I had had a year to prepare myself that animal companions don't live as long as we do (it was in early December last year when I noticed that her heart was beating like a rapid snare drum; she was lying on my pillow with her heart close to my ear), I still broke down in two vets' offices while I dealt with the inevitability that her long life was coming to an end.

There are pictures of her on this blog, but I'll add some just so you can see them now rather than having to scroll around:


Curled up on her favorite crinkly toy. She never went for it as
a play toy thing, but she loooved to sleep on it.

Then there is the earlier post where I showed her lounging on the grass on a warm February day:

Yep, in ATL it's really warm enough, even in February,
to spend some late afternoon time sunning oneself
And fortunately, the weather over Thanksgiving was warm, too, relatively speaking. So we were able to trundle along outside to soak up some rays. I experienced a sort of peace during that weekend - there was the loneliness of being by myself partnered with the joy of buying food that I would cook only for myself (such as Rock Cornish Game Hen). There was the quiet solitude of spending most days listening to a book on tape (on this weekend, the above-mentioned Hard Times with an extraordinary narrator) and doing my Christmas knitting partnered with some time on Thanksgiving evening with my eldest niece and our next-door neighbors, sitting and talking. And there was the otherwise-cold bed with one cat against my belly and the other against my back, doing everything they could to help keep me (and themselves) warm.

So while Webmaster Bill went up to see a large houseful of relatives of 3 consecutive generations, I knitted children's sweaters and a scarf and more sweaters. Guess who wanted her picture taken while I was at it??

Big kitty who has gotten considerably
smaller with heart and kidney problems


She's at peace, now, on the other side of the Rainbow Bridge, that wonderful place where we get to meet all of our dear, departed furry and fuzzy and feathered friends that have joined their lives with ours. Rest well, dear kitty, and someday you will sleep on my head again.

And of course, there was the afore-mentioned Christmas knitting - a great nephew in CA, a great niece in IL, and a kitty hat for friends whose tree-topper is Yoda. How could I not spend an evening knitting up this fantastic Yoda hat to be kitty sized (and it almost was!):

After its 3rd time through the washing machine,
it finally felted to the size
of a small head (not shown here!)


The cool thing was that once you make and decrease the ears, they stick out the side, and while it's drying you can make them kind of curve to resemble Yoda's ears themselves. Trying the hat on the cat was great fun, and made possible by the use of an abundance of kitty treats.

Then there were the sweaters for little ones. I'm beginning to "get" the fun of knitting kids' sweaters - they're quick, they can be really cute, and as long as you get the gauge to almost size, it doesn't matter if they're a little too big - the child will grow into them!

Bright colors for this little girl, who
has become infatuated with "bunnies"

There is a sweater that I can't upload here, as the recipient has not received it yet due to too busy schedules during the Christmas season. All I can say is . . . the buttons really set it off!

Little blue sweater for a little boy,
complete with teddy bear

And then, of course, there was Christmas, then all the many days off in between (fortunately I'm working for a company that recognizes the wisdom of closing the office when most everyone is going to be on vacation, anyway), including finally reading The Millenium Trilogy by Stieg Larrsson (yes, it really is that good) and watching a ton of movies.

For all of you who know me, I mean, really, really know me, I will confess here: I bought a ticket to the 3-D showing of Tin-Tin. Why? Well, for the same reason that I saw 13 Days in the movie theaters a decade ago: it's the movie where they show the preview of The Hobbit. All I can say about the preview is WOW. I can't wait. I thought that the love and excitement had cooled off into a warm, nice glow, but no, not really. PJ and his group are going to do things with this interpretation of a mythical masterpiece the likes of which the world has never seen. I am so very, very glad that I live in a time where these masterpieces can come to life on a big screen. Really I am.

By the way - Tin Tin is a really good movie. There were moments when I even forgot that I was watching an animated, motion-capture film. Definitely a boy's adventure: pirates, adventures, and intrigue.

Now that all the Christmas knitting has ended and before I spend time at The Mountain, the time has come to put down the knitting and pick up . . . the needlepoint! Yes, I went rooting around in a closet, wondering what was in these packagesssss, and I found some of my mother's needlepoint. She had started one piece (but just barely), and there was no yarn to go with it so I went with my best guess on it.

I'll take an aside here: if you do any sort of knitting, needlework, paper crafting, etc., please, please put all of your materials together, or at least put a list with your package of materials, colors, etc., or even just show your nearest and dearest what you are working on and what your intentions are for it.

So anyway, on the one I've matched the yarns as near as possible, and with the recent supply problems with Persian yarn, I'm finished on it until I can find just one (or maybe two) more skeins of the background color. I've started a second, also one Mom bought at my shop, also Irises (she always waxed on about pansies, but seemed to have an affinity for irises in her NP) for which I will need a frame (of course, I have several, but it will involve going to get them and I'm a little lazy today), and the final . . . ah, now that is a story!

Several years back, maybe as many as 7, Mom received a gift of needlepoint from her sister-in-law, complete with sufficient thread to finish the design. The canvas was 18 count (18 sts to the inch, for all you knitters out there - canvas comes at 10 sts/in, 12/13/and 14 sts, and 18 sts to the inch, not to mention 40 sts to the inch - this latter is stitched on silk gauze and is very fine, very beautiful, and I'm not going to do it in this lifetime. Think dollhouse rug.) and Mom couldn't see it. Family dynamics being what they are/were, she asked me to do it for her. And asked, and argued, and demanded . . . and still it sat there, because, well, I had a shop to run and models to stitch and had no time for personal stitching anyway. When I began poking through the above-mentioned bag, I decided that it was time to begin stitching it (after I had finished the more traditional needlepoints) and to do so would require just the right kind of thread. And like many projects I'm looking forward to, I like to savor it. Contemplate it, think about it, work on an appetizer for a bit . . . until I can't stand the antici---pation any longer, and just pick it up and work on it feverishly with its beautiful colors. The hummingbirds are going to be silk, the leaves in combinations of cotton and wool, and the remaining background wool. It will be a delight.

For right now, then, I please myself with a really cool deep-purples-and-blues irises in a kind of 2-D design (pictures coming soon!) using traditional wools. After all, I helped Mom pull these yarns, listened to her agree and argue, and if I liked those wools all those years ago, what's not to like now? The fancy stuff will take care of itself - this wintertime is all about quiet contemplation, enjoyment, carefully finishing what had been unfinished.

Till next time, have a marvelous new year, and hug the ones you love. Include yourself in the hug!

Monday, November 28, 2011

Steve, Anne, and Ken - A Tribute to their Creativity

So first came the news that Steve Jobs had died. I learned much about him during the next few days' worth of all-Steve coverage on the various news sources.

Then there was Anne McCaffery. I had seen her a couple of years at Dragon*Con and have enjoyed her world of dragons (and occasionally science fiction, especially "The Crystal Singer") since I was 16.

Now I just learned that the director Ken Russell has died. Wow.

There's three. These things always seem to come in threes.

Three creative geniuses who all influenced my life and creativity in many different ways.

Steve, of course, because of his Apple. I learned how to use an AppleII back in the 1980's, when its design and layout was seen for what it was, and companies were still using a variety of different computers according to their needs. By the early 1990's, of course, all that had changed. But you could design a folded hand-out on an early Apple, you got to see how much time was going to elapse before the computer would respond to your commands, and you could adjust the tabs and margins by looking at them and moving them to the places you wanted to. On a PC? Man, you were in trouble, and you had better learn how to do it while tap-dancing around your boss. On a Mac? Simple and easy peasy.

Now, of course, I have an iMac and a Nanopod and both have changed the way I do things. I used to record albums on cassette tapes and just listen over and over, in kind of a zone, to the album, letting my thoughts go where they may. Now, though, when I work out (and I will again soon!), I just stick my Nanopod with its little clippy-thingie on my shorts and who knows what song will come up? Will I listen to some mellow stadium music or will it be a Celtic piece? Will my running pace keep up with a drum machine or will I slow down to a ballad? I still listen to music on a stereo or in a car in the one-song-follows-another format, but now I have an alternative. And I was able to create a CD of sailing songs for my aunt and uncle who have a sailboat because of a Mac, and put some pictures together in a slide show with music playing in the background from a roadtrip I went on. Those are only the tip of the iceberg that my little iMac is capable of doing, and doing quite willingly, thank you very much.

Plus, with an iMac, I have such a greater range of creativity for design and layout. Not so much now that I don't have my shop, but on-line it is still easier to move things around, format, add backgrounds with an extra program . . . the list goes on. But when Steve said how he came to audit a class in calligraphy after he had dropped out of college, and how that was the spark that led him to design lots of fonts for his Apple, that revelation brought home again the knowledge that all designs start. Somewhere. With one person (or a collaboration, I suppose). There was a time when there were no fonts, when you could not choose how something would look: it was chosen for you. You had to answer to the technology; it did not answer to you. Apple has always been more intuitive and more responsive to its human counterpart. Without Apple, what would the PC have become instead?

Then I heard that Anne McCaffery had died a couple of weeks ago. Wow. Her books were intense. I read the Dragonriders series when I was 16, and then in a heartbreaking turn of events, my finally-sober father gave them to me for my 17th birthday. I knew he was trying to reconnect with me, and he had spent time in a bookstore looking for just the right book that would please me. He found them, too. When I unwrapped them, of course he guessed that I had already read them, and I could just feel both our hearts breaking for the missed opportunity of "This is just the book I've always wanted to read!" He was gracious, of course, and I have my copy of the "Dune" trilogy instead. But the hurt was deep, the look on his face was still there, and I had such a hard time re-reading them; it was only about 5 years ago that I picked them up again. After all, what could be a greater tribute to Dad's thoughtfulness and reaching out than to pick up what he had handed me, all those years ago? It's what he wanted me to have and to enjoy, after all.

And I fell in love with Pern all over again: its culture, its history, its First Fall legends, its harpers and riders and holders, and of course, its dragons. I re-read "Dragonflight" and "Dragonquest" and was touched by the story of Lissa and her struggles and about the moving through space and time. Then, at Dragon*Con, I picked up some of her books at a vendor, and happened to be reading one in one of the hotels when Todd McCaffery came over (recognizing the red cover, of course!) and said that he knew an author who would love to sign her work . . . ! *Gulp* How cool was that?! I saw the line for Anne McCaffery's autograph, though, and decided that no matter how much I loved her work, I could not bear yet another line. So perhaps I missed my chance to chat with an author, but her work has shown its strength of surviving for years.

The Dragonriders series were books where women were strong characters in their own right, another fact that we readers of science fiction and fantasy take for granted these days, but were sorely lacking in the 60's and 70's. In fact, one of my other favorite authors, Patricia A. McKillip, deliberately wrote the second book in her trilogy, the book entitled "Heir of Sea and Fire," to begin to play with the idea of a female lead character, and what would her quest look like? Here, then, was another creative pioneer, one who not only got her books published during the male-dominated days of sci-fi, but made her main characters adult women and the men who respected them. The manipulation, the whining, the child-woman were all out the window with her. Plus, she created dragons!

Then there's Ken Russell. I was into "Tommy" the movie in high school (as seen on HBO, of course!). Way, way into it. Its leading man was gorgeous with all of his thick, yellow curls and that magnificent strong voice of his, the way in which a newly freed Tommy reveled in his hearing and sight, and his attempt to show other people how to get from where he was to where he is, all showed a profound message. And again, the original rock opera was performed on stage: Ken Russell took that stage show, added the story of the husband and wife on their honeymoon, the shot of the plane zooming down in flames, the dasterdly-ness of Oliver Reed as Tommy's stepfather, all of those came from someone's imagination. There was a world and a time when these icons and shots did not exist, and now, thanks to Russell's creative genius, we live in a world where these things do exist.

I've only seen "Tommy" once in the theaters: when I was a student in Paris and one of the movie theaters was showing it. I went with several musically-inclined friends, and right outside of the theater was a group of Hare Krishna's, dancing around and asking for donations. I thought THIS was the most honest and profound message of this movie/rock opera concept: the messiah-figure has a message, he finds followers, and what do these followers do? They become ridicule for jokes, or they bring down the messiah when he cannot bring the enlightenment that he has promised. I don't know if Pete Townsend had all this imagery in his mind when he wrote the music, but Ken Russell brought visual imagery to a piece of music that has existed on film long past the days when The Who performed it on stage.

So while I haven't made as profound an impact on the world at large, I know that I have in many, many small ways done so by bringing, even for a short time, a place of beauty and creativity into being, and being a clearing house for threads and yarns and stories from all of my stitchers, all through the years, so that they had a place where they could create their tableaux, their hopes and dreams, and their surprises, too.

Friday, November 18, 2011

My Fairy do so TOO have a head!

She does - I finished stitching it a couple of weeks ago, and I'm right now filling in her gorgeous mane of brownish-red hair. But I haven't taken pictures of her head, because my camera and its "ooh-wow" effect is right now trained on my fairy herself. So there!

She (Sidh?) is gorgeous. Simply amazing. On the cover of her pattern the picture shows her stitched on brown fabric. Not my taste - maybe it goes with her hair, but her gown on which I've worked for so many years just screams "Twilight Blue linen!"

Oh, perhaps I should introduce my little fairy. She is the Fairy Flora in the line by Mirabilia Designs. She is one of the earliest designs in this line that came out in the late 1990's. Yes, I've had her since about 1997 or so, when Mrs. Dennis herself gave me the piece of fabric and the pattern, and said, "Here. I think she looks like you, and here you go." No preamble, no special occasion, just "here." Which for Mrs. Dennis, who survived the Depression and was not someone to give something away on a lark, was not like her. I've treasured this design and the gift of the fabric, and began working on it in probably 2001 or 2002, when I was feeling overwhelmed by all the great knitting out there.

You see, as I've said in previous posts, I learned to stitch first. I can look at fabric, thread colors, and see how they can be changed, adapted, modified, and improved upon almost as easily as I can tie my shoes. I've helped customers over the years doing this, especially with these elaborate, years-long stitching designs, and I've found that changing a grounding fabric really brings out the design. Plus, I don't have the same vision in my head as the designer, so I can see how the design speaks to me (or a customer) and work within those parameters.

So I think I started this pattern more out of a sense of knowing that there was truly "something" out there that I could do well, perhaps better than most, and that "something" was this glorious design, full of swoops and swirls and all manner of prettiness. And since I had the shop, I had the advantage of working on a lap board with double-ended needles and a Q-Snap frame. These tools gave me the knowledge of how to use them, how to sell them, and what the end product would look like. For years I had stitched in-hand, meaning holding the fabric in one hand and bringing the needle up and down with the other. All very well and good, and how I stitched most of my shop samples (since I wanted to get them done quickly), but this piece, ah, now this piece called for something more . . .


How my fairy appeared for many years on her stand. Not completed
as she is here (she was a long work in progress), but above is
the stand set-up on which I worked on a quiet weekend morning.


So what I would do is balance the stand on my lap (a wood-finished Baby Z-Stand by K's Creations) with the Universal Clamp to hold my Q-Snap. There are a lot of different fabric holders out there - hoops, top-and-bottom fabric holders that you roll the fabric, stitch the fabric, or velcro the fabric onto, and Kay realized this fact when she designed her extensive line of frames. I think I only sold one or two floor stands of hers, but her lap stands and stitching stools were extremely sturdy, attractive, well-built, and made with stitchers in mind. When I began stitching this piece, I realized how much more evenly my stitches fall into place (they don't have a slant on the top "x" that shows in which direction I am stitching - L to R or R to L).

I also had the option, since I was using a lap stand, to use a laying tool. A laying tool is a handy little device, made of wood or even a metal fingertip cover (called a trolley needle) which you lay with your non-stitching hand on top of your fabric as you make each stitch to keep the tension on your threads even. I used one called the Practical Laying Tool (no longer in production, sadly) that has a square wooden handle (slightly chewed by Dave the Dog) with a large needlepoint needle embedded in the top. (For a superb explanation of the hows and whys of laying tools, I suggest this page from the Nordic Needle website.) For my part, I found that slowing down just a teensy bit to ensure that each stitch is even, not slanted, and the threads are not twisted (all thanks to the laying tool) has really made a difference in my finished project.

In addition to a lap stand and laying tool, I also used a twin-pointed needle by John James. They came out in 2001 or 2002 at the Charlotte Needlework trade show, and again are only useable when you are not holding the hoop in one hand. What you do is, you lay one hand on top of your fabric, one on the bottom, and just stitch. The eye of the needle is in the center, the points are on the end (hence the name of Twin-Pointed Needle) and it allows your stitching to progress relatively easily without having to take one hand above and below the needle to make the stitch. It's a bit ambidextrous, but I was using the laying tool so I was learning ambidextrous stitching as I went. It also takes the strain off of your wrist, having to move it up then down as you stitch.

And for a big project like this, a frame like this QSnap made all the difference in keeping the fabric out of the way and not all crumpled up and dirty as it would have if I had stitched it in-hand. Yes, there are wrinkles on it and even an indentation on the top photo that shows where the QSnap lay, but those will come out in the blocking. I've done it hundreds of times. Linen loves to wrinkle, and once it's wet and dried on a blocking board, it becomes just as straight and even as you would like.

But enough about technique - one reads a blog for the photos, right? So here are some photos of her skirt's hem:


Those little spaces that form little swirls on her skirt? Ah, now those will one day be filled in with beads. Lots and lots of beads. THAT stitching I will have to do in-hand, since the QSnap frame literally snaps over your stitching, and if there is a bead in the way . . . you get the picture. Glass beads are enough of a "challenge" that I don't need to worry about little bits of beads in cracks on my floor or on my bare feet!


I just had to take a picture of the contrast between the bright, vibrant flowers that lay over her gown (she's a fairy of flora, after all) and the light pinks and purples of her gown itself. As I began to stitch these clumps of non-gown symbols, I began to realize what an art it is to design counted cross stitch. Really. You could, of course, translate these forms and colors to paint, but where would be the joy in that endeavor? The texture, the colors that cross stitch has that are unique to it: any stitcher will be able to look at the purple and say "208, 209, 210, 211" and another stitcher will know exactly what they mean. There's just these shades, you know? It's more than "forest green," it's 3347 with a vine of 3371. The color 3371 is used for branches, dark highlights on trees, and backstitching. But you see it on these light peaches and purples, and it just draws your eye along the texture of the fabric. You see the detail because of these branches. And the gown just flows from one texture to another.

OK, one more showing the blackberries on the bush and my fairy's gown:

Fairy gown with beaded hem (minus beads) and amazing contrast
between reddish-pink flowers, blue greens of forest, and blackberries.


I've helped many customers pick out the threads, materials, and beads for their Mirabilia fairies, and I am so happy that I have one of my very, very, own to show off now. Head or no head! Again, here is another "in toto" shot. The extra fabric will be necessary for her raised wand and her wings. Which are stitched with blending filament, and are very, very large. *SIGH* She will be beautiful when it's all done, and you know, she's pretty darn amazing now.


Sunday, October 30, 2011

Brambleberry Sweater is DONE!

After 3 visits to The Mountain (2009, 2010, and 2011), endless hours at home, three swatches that I blocked (thank you, Brooke), the encouragement of a deadline of the October AKG meeting, and 2 viewings of the last episode of "Lost" before I, too, changed my subscription to Netflix, I can finally say that I have a finished sweater!! It is lovely, it is blocked, it fits, and I have worn it out to the North Georgia mountains where it kept me warm, warm, warm. And best of all (besides the fact that it fits!), it is the perfect orangey-red color that perfectly fits with this time of the year. The yarn is kind of red, but that red that is kind of orange, and there are flecks of yellow in the reddish yarn. So, without further ado, here is my beautiful new sweater in all of its orangey-red cabled glory:


It's almost a work of art, no?

Here's another view, same sweater, from the front, too:


I really can't believe it's done. And I made this!

And really, I must take this opportunity to apologize for the long length of time between posts, from Sept. 11 to now. One of the weekends I spent out of town at my college reunion (25 years!); another visiting an alpaca farm where yes, I did come away with more than just 'paca poo; one Saturday at the Decatur Beer Fest and the next day recovering (no more absinthe. Ever.); and one weekend spent with friends in North Georgia. All these are worthy causes and reasons, and then there's my new day job (part-time, but then my web orders have started to go through the roof which means after-work is spent filling them), so my blogging time has been compromised. Not my project, time, mind you - several pictures will make their ways to this blog very, very soon with accompanying posts. Not this time, though; this time is my long awaited "My Brambleberry Sweater is Done!" post.

So yes, this is the first sweater where I've actually followed all of the experts' advice and BLOCKED my swatch before I selected my needles. Which was an earlier post and has resulted in a class that I'll be teaching in November about gauge. It was a case of using not just the correct needle size (that didn't seem to matter), but using the correct type of needle: the plastic needle made the entire cable just totally collapse and loose its structure, but the wooden needle helped bolster up the cable and keep its "body." Really amazing, that.

And this was the first sweater pattern I've ever come across that has the even-numbered rows as the right rows (knit right to left) as opposed to odd rows being the right rows (wrong side vs. right side of a garment). That called for some interesting verbage from me when I started to knit the sleeves one late-ish night this year at The Mountain and I realized my mistake and had to rip out those eight rows and start again. I mean, it wasn't as though I didn't have notes and arrows to that end! The designer also added selvedge stitches to her pattern, so you cast on 2 extra stitches but the pattern and directions exclude those stitches when telling you what to do. And it's good to have those selvedge stitches because they're needed for the seaming. But more on seaming later.

This pattern was a fairly easy cable sweater to knit: the design remains the same (cable on the 2nd row) for the first 10 or so pattern repeats. A few rows before you begin to decrease for the armholes, you then "walk" the cable over, so that the K4 P2 rib becomes the new cable twist, and continues in this way for 3 or 4 rows until it "walks" back to the original cable pattern. This contributes greatly to the movement and attractiveness of this sweater; some would say rhythm.


Here is the detail from where the cables "walk" and then return to their original journey.
This is a slightly lighter shade than the actual yarn,
but there really are that many colors in this yarn. Amazing.


I did adjust the length of the sweater, as I am a short person and even though I knit the size M (44"), I still needed to shorten the length so that it would not resemble a small dress. This of course caused me some consternation when I began the armhole decreases, but I took copious notes about the adjustments I did to the back that proved handy when I did the front. I also finished knitting the front while listening to the audio version of Watership Down earlier this year in order to keep familiarity with this pattern and also so that I would not be making those crucial armhole-decreases-while-keeping-cable-pattern decisions with adult beverages clouding my judgment.

And as I've posted before, I'm really really really glad that I knit the sleeves at the same time. The slight aggravation of remembering which row I was on and which ball of yarn was minimal compared to the huge aggravation I would have had if I had had to remember which row increase I did when. Oh, and I did not do the cable pattern on the sleeve edges - I learned from my former teacher, Christina, that a cable sweater does not necessarily have to continue its cable pattern under the arm. So I just continued knitting the K4 P2 rib pattern as I increased the sleeves and it made a lot of difference with time, aggravation, and ease of wearing.

Then there was the knitting it together. Before I did so, and starting the day before my birthday and visit to the alpaca farm, I began to weave in the yarn ends. I HATE weaving in yarn ends. It's a pain. It's kind of meticulous, kind of mindless, but you have to pay some attention to what you're doing and it just seems never-ending. *Blech* I wanted to weave in enough so that by the time I had finished sewing up the seams, I wouldn't have that many yarn ends to weave in before I blocked it. *Blech* again. The discipline of martial arts training kicked in here, and I meticulously wove in yarn ends that weren't on the seam line. Some of them, anyway.

Which brings me to seaming. Ah, seaming. There are people who hate to sew up seams. Me, not so much. I don't mind seams - remember, I use to frame needlework and THAT can be meticulous and all-encompassing. But I made the mistake I've made in the past, where I decide what a shame it is to waste all that yarn at the shoulder join, and wouldn't it be better to just knit a portion of the sleeve seam?? Well, no, no it wouldn't. And here's why: it bulks up. No matter how careful you are, no matter how much easing you're doing to the portion closest to where you began to join the sleeve with this method, you're going to wind up with one side flat and one side with 5-10 extra stitches that you need to answer for. So the solution is to take it out and re-try it. And the same thing happens. What is that definition of insanity? I knit one portion of one sleeve during the final episode of "Lost" using this method. The entire 2 hours of the final episode of "Lost." When will I learn??

You guessed it - I put it down, picked it back up, and with that strong martial arts discipline I learned oh-so-many years ago, I started from the edge, made the center of the sleeve ribbing (in between the cables) match with the shoulder seam, for both sleeves, all while re-watching the final episode of "Lost." Inset sleeves are tricky in the best of circumstances, but inset sleeves that include cable/ribbed patterns require meticulous attention to which stitches you are seaming to which. So here is the end result:


Since the seams here are obvious, even to the non-knitter,
I had to be very, very careful with making sure they matched.
Exactly.


And here is a close-up, showing sleeve detail of which I am especially proud:


Sleeve seaming detail

Of course, that meant that I had to weave in and cut off otherwise perfectly good, long yarn ends that all meet at the shoulder join, but I'll just have to get over it.

And another thing of which I am extremely proud are the side seams. They are almost invisible and I really, really have to say I am proud of the extra time I took to make them almost as perfect as any stockinette stitch sweater (I've never seamed on reverse stockinette, a.k.a. purl, stitches before:


Side seam detail. You almost can't see it. Go me!

Then there is the neck. Someday, I may re-knit the neck. The cover picture of this sweater shows a very, very small rolled neck. Not for me. Mine was much longer; almost too long. The neck is knit after the shoulder seams are joined (giving you a vest-like sweater), and this one called for picking up and knitting with smaller needles, starting with a K1P1 rib, then decreasing, then knitting until it reaches where you want it to reach. Which on me, after 6 rounds, was about to the top of my collarbone. Yup, I have a large-ish shoulder-to-neck measurement, and therefore need more neckline than the pattern anticipated. And it's not the pattern's fault, either - it's a by-product of not knitting enough sweaters for myself and knowing how things will finish up. So what this means is, someday I may decide to undo and re-knit the neckline, using the same size needles and continuing with the pattern for at least 2 pattern repeats (2"), then starting on the formal neckline. But not now - now is just for wearing and admiring and receiving (I hope!) complements from those who see me in it. So here's the neckline in question; knitters out there, let me know your thoughts on the necessity of re-knitting this neckline at some point in time:


Longer than I anticipated, this is the rolled-neck ending to this sweater

Oh, and the other amazing thing about this sweater, and another reason I chose to knit the size that was close to my bust size instead of L (48"): it relaxed after I blocked it. I was really beginning to worry that I had knit an M and the sizing gods would punish me by having it be too tight and with too-tight cables. Now that would be embarrassing. But no, it relaxed both out and down, so the sleeves reach a little bit below my wrists, enough for me to pull my hands in when it's cold outside (like in the N. GA mountains), and the horizontal is eased so that it fits comfortably around my 44" (pattern size M) bustline.

Hurrah! It is finished! And just because it's my blog post and I want to, here is the Brambleberry sweater in all of its finished glory (again):


*SIGH*