Still Life from Quimper

Still Life from Quimper
A shot of an almost-completed still life needlepoint

Welcome to my Blog

So very happy you came to visit. Now, pull up a chair, pour a glass of your favorite beverage, and read on about adventures in needlework.

Sunday, April 29, 2012

My Little Fairy is Getting Her Wings

First, of course, she got her face.  I promised you a while back that she had a face (at least on the paper design), and this fall and spring I have stitched her face and hair and accompanying bits of vines and berries.  Here she is with her face (not yet backstitched, as I prefer to do that in-hand and not on a frame):


Fairy Flora with long-anticipated face

It was interesting coming back to the face tones - I found them more challenging to stitch than the bottom parts of her gown, intricate as they were.  Or maybe not; the gown sections were blocks of color and if you stitched one side of a color, it was easy to add in the additional colors to the side of your first block.  I've included a re-print of her skirt detail below:

Skirt detail with "blocks" of color

So you can see that once a color went in place, the remaining colors went around it and above it and filled in with it.

One would think it would be easy to stitch a face with the same detail and stitching abilities, right?

Not really, no.

Maybe it was the length of time I was separated from my fairy.  They are, after all, amoral creatures and don't take too kindly to neglect.  One always gives the Wee Folk bits of cream, shiny pennies, and the like so as not to fall out of their good graces.  Perhaps I should have taken this advice when I returned to stitch her face after an absence of about a year?  Because you see, I had to stitch her neck twice in order to make her neck swan-like and not boxer-like, and to ensure that her face lined up with other stitching points of reference.  Like her hair.  Or the vines around her brow.  Or . . . you get the picture!

And no, I did not take pictures of said ooopses!  I'm sure many of you reading this blog have had your share of rips outs, starting with the realization that your neck doesn't look right . . . then the bargaining that you do to see if your face will align anyway . . . then the denial that it really won't matter if someone sees it . . . then the anger that, in fact, a delicate fairy does not need a boxer's bull neck . . . and finally the acceptance that results when you pour yourself a glass of your favorite beverage that you need to take the edge off, and begin to rip all that work out.  Yes, there are phases to ripping out; and don't they closely look like the ones that accompany the steps of grief??!  I mean, you put all that time, thought, counting, and care into your work, and one (or three) tiny miscounts means that you come to grief and all its stages.  A little adjusted, of course, but still, grief (and some feeling of foolishness) all the same.

Now that my fairy has her little face,  I am about to venture into the scariest part of this entire stitching adventure next to beginning such a project:  the Kreinik threads.  Ah, the Kreinik threads.  They are a boon to the beauty of counted cross stitch, needlepoint, scrapbooking, and even fly fishing (think about it), but they are also a bane to the stitcher.  You see, you have to be very, very careful when you stitch with them.  I am using one shade of Kreinik Blending Filament with three different shades of DMC thread (not at the same time, thank goodness!)  And her wings are enormous - they are easily 1/3 of the stitched area at the top of the fabric.  At least.  And when they are finished, they will, together with all of the beads that will adorn her wings and her hair and her gown and make her magic wand, add a touch of magic and whimsy and not-quite-there-ness that really makes her a fairy.  (Let's face it:  I grew up reading and re-reading different editions of Grimms' Fairy Tales and am currently reading Lord Dunsany, so I'm allowed a little imagination in my stitching realism!)   But all that is in the future.

I remember through all of the trade shows I attended I learned the same advice that I passed onto my customers to make stitching with Blending Filament easier:  use shorter lengths, knot the end of the BF to itself near the eye of the needle, and use a large enough needle to "open" the fabric.  All of which I'm doing (well, maybe not the shorter lengths part, because that means I have to begin and end threads more often and I don't like doing that:  it wastes thread and valuable stitching time), but let me tell ya:  knotting a bit of metallic thread together with a bit of stitching filament to itself near the eye of the needle ain't an easy thing to do!  The thread has a will of its own and wants to just float off into space, on the wings of a fairy.

Using the twin-pointed needles I'm using, like these shown to the left, still involves the extra step of using a regular needle to weave the end of the thread in the back (not knotting it), stitching a cross stitch, then unthreading the regular needle and re-threading the threads through the eye of the twin-pointed needle (I use a needle threader).  It makes the actual stitching a whole lot easier, it really does, and I think it makes the stitches much more even. They don't tend to slant in one direction or another.  But the whole starting and ending of stitching is going to be an interesting endeavor.

I must confess, I did start stitching her wings as soon as I finished taking pictures.  I found 2 of the three DMC colors that I needed in my stash bag, not in my project bag, which is OK.  The needle-geek part of me even knew what those colors look like:  it's 451, 452, and 453.  They're kind of a greyish mauve.  Not quite grey, but not mauve-y either.  They'll make a great color on top of the Twilight Blue linen my fairy is stitched on, with a lot of subtlety and shimmery-ness, too.  And thank goodness I only have one color of Blending Filament to use!  I've got 2 spools, and I hope that will be enough for her wings.  Like I said, they're enormous!

And with all that metallic thread to stitch on my fairy, maybe I ought to take a page from old Irish folk tales and leave a penny on my stitching stand to make my metallic stitching experience enjoyable!

After the metallic thread comes the beading, at which point my lovely fairy will come out of her Q-Snap frame and will go in-hand.  If you look at the frame (plastic PVC piping with plastic bits that snap on the top), there is no way to move her around for beading purposes.  So maybe I'll start with the beading and then if I have to move her I'll take her completely out of the frame.  But the bottom of her gown gets beads, too, and any snap onto the bead will, obviously, break it into many bits.

Will keep you updated on her progress . . .


Sunday, April 15, 2012

Stitching AND finishing

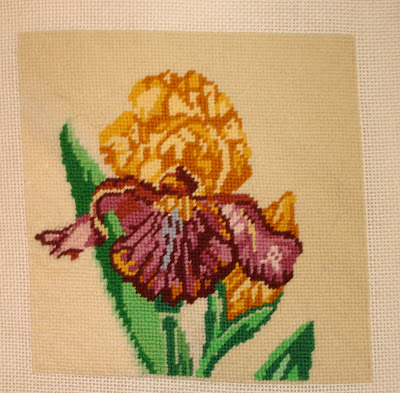
Since the start of the year I have taken up some stitching again, some needlepoint pieces from my late mother's stash and one cute little cross stitch piece. For the needlepoint there have been some supply problems from one of the needlepoint yarn makers (like, they have not shipped anything for over 2 years due to the economic downturn), and as a result I was at a standstill for a while on my large Iris.

So while I waited for more yarn to come in, I also completed some socks:


. . . and the back of my Rayon Blue Heron sweater (with help from our new kitty who loves to chew the yarn in twain. But that's another posting . . . ):


Blue Heron Rayon sweater with bust shaping. I really, really
like the shaping on this pattern - it's slinky and is going to be just fabulous
for a spring or summer event. Starting again on a
smaller size is going to make all the difference.
And with that nice lace pattern, I think this means I get to treat
myself to a nice, lacy camisole??

Finally, about early March, some yarn finally arrived and I was able to finish my large Iris!! I was able to take it off its frame, too, and this is a good thing because I found yet another piece of my mother's that will fit perfectly on this frame. I had fun playing with choosing the colors, as she had received it as a gift with DMC embroidery thread as the yarn/thread for it, and she just couldn't figure it all out. She had started stitching the background with 1 strand of Persian yarn and it was really hard for her to see it. I got to play with new and pretty colors back in January, so this is going to be something all of my own when I finally start on it. Probably this summer.

In the meantime, I finished stitching the background of my large Iris which was the only thing missing:

I am so happy with how this piece turned out. With Persian yarn, I could combine strands from the old and from the new dye lots and the RH final corner looks seamless.

Now comes the blocking portion of it, which I'm not going to do until I decide how I want to frame it. Which, I admit, may be a while; I have a ton of needlework already to hang in our house, and this piece will block back into shape. I know - I've done it a hundred times with pieces much more cockeyed than this one.

The other stitching piece that I finished recently is my little bird. This was one of 3 birds of a series I bought when I learned that the Danish designer, Eva Rosenstand was going out of business. Her company later found a buyer, but they no longer weave their own linen nor dye their own threads. This latter, especially, is sad for me - her view of colors was unique in all the world and only her kits made prior to 2002 or so will have her original vision to them. Fortunately I have several of her kits, one of which involves the rich Dutch blues, that I will begin someday. It will match the one that I finished a number of years back.

ANYWAY. This little bird is the final in the series of 3 - the first was the Wren in the Furze (yes, there is a nursery rhyme that starts "The Wren, the wren, the king of all birds/St. Stephen's Day was caught in the furze"); the second was the little bluetit; and this one is a little brown bird in a Cherokee rosebush (or its Danish equivalent):

Here s/he is! Standing so proudly, and the leaves which are yellowish-green and colors I would not ordinarily use are really quite a complement to her brown-ness and the pink of the roses.

The beauty of this design is the simplicity of the color changes - the bottom petal on the top rose just looks like it is folded up a little bit. And what suggests this? The sudden color movement from mauve to pink with a single strand of light grey backstitching to delineate the edge of the petal from its back. The human eye does the rest. People asked me frequently "Surely you must design your own patterns?!" to which I only have to show this picture to explain that there are some of us who stitch and bring pictures to life, and some who can imagine and create. I am in awe.


I have also been making great strides with the other Iris picture, the one that looks more modern? Not cubist, but not as realistic as the large Iris by Lee Designs. It has no shading, but each of the petals and leaves is its own patch of color. Which makes the entire piece very striking. Strides of it are here:


Part of what gives this piece its beauty is the intensity of these blues and purples. I needed more of the dark green DMC needlepoint yarn, and it did not go as far as it needed to. The Rolaframe is a doozy to set up - it takes 2 people to mount a piece of needlepoint onto it, and many were the times my staff and I spent setting one up for a customer.

And one more thing: my infamous swan piece is finally done!!

Monday, March 19, 2012

Contemplation with Projects

This year, my goal at The Mountain was not so much knitting as it was trying out some designs for some self-designed sweaters. I took a class in Percentage Sweaters at the 2006 Plying the Arts Festival (you can read more about it here at World in a Spin) and I feel much more confident about knitting some fairly simple sweaters for me and Webmaster Bill after this course. Plus, I have this well-thought-out notebook that is complete with notes, diagrams, and lots of informative information, and I really, really must use it sometime.

With that goal in mind, having selected yarns from shops without any definite pattern for them, I chose The Mountain as my place for swatching and trying out new patterns. You must understand, I hate swatching. I realize it is extremely necessary to the ultimate garment that I will eventually wear and will spend hours (months? years?) knitting, but it takes every ounce of discipline to actually sit down and meticulously knit a small thing, measure, re-knit on different needles, re-measure, etc., etc. I recently had the lovely experience of ripping out half of an entire back simply because I lied to myself about # of stitches per inch to bust size to fit . . . and I realized that the satisfaction of sitting down and knitting does not add up to an ill-fitting garment. I wonder if that's why I like knitting for the younger generation so much?? I can knit big (because I knit loosely) and justify it with "they'll grow into it" in a way that, well, I'd rather not grow into too big knitting!

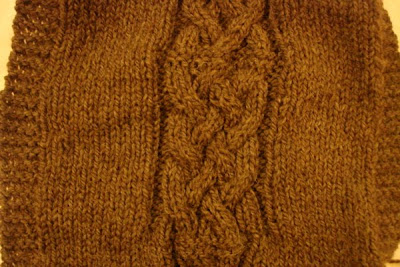
First on the docket was a cable-front sweater made from Cascade Yarn's Eco-wool that is a nice, big, thick undyed (or minimally dyed) yarn. Mmmmm, yummy. And perfect for a man. It appears that they've added some colors to this line, but there you have it. The earthiness of the tones did turn off some knitters who preferred colors to earthtones, so I guess those knitters now have some additional options. Anyway, I went through my Barbara Walker stitch pattern books, narrowed the selection of cable patterns down to 5, and with the discipline that only The Mountain and its Knitting Water can bring (and about 2 dozen talented knitters who weren't going to let me get away with being a slacker), I began to swatch cable patterns. I learned whilst swatching that I will have to go from a size 10 needle (what the yarn calls for) to a size 9, or the cables won't be tight enough. Except for 1 cable, but I'll just put it out there anyway.

Thanks to my class notebook's sweater notes, I also noted which pattern I knitted and what page it was on, so that in a few months' time, when I have decided what cable I'm going to knit, not an easy task, I'll be able to reference the pattern. All of them are taken from A Second Treasury of Knitting Patterns by Barbara Walker, personalized and signed by herself *sigh*.


Alternating Cable, P. 166


Aran Braid, Pp. 166-7


Loose Five-Rib Braid, P. 169


Four-Rib Braid p. 177


Latticed Diamond, p. 194

One of the good things about finding the discipline of swatching is that you discover what you do not like. The above Latticed Diamond is a beautiful but oh-so-complicated pattern - there are cable instructions even for the back of the pattern! So, while it would be eye-catching and bring lots of complements, it will be waaaay too much work for me for this sweater at this time.

We're leaning towards the Aran Braid (choice #2) or the Loose Five-Rib Braid (choice #3). My only concern with #2 is that it is such a narrow pattern it might get lost as the centerpiece of a big, thick sweater. On the other hand, it is a dense enough pattern that I might be able to stay with size 10 needles! So, like I said, the goal was to try out patterns, see how they look, see how much I enjoy knitting them, and then putting it away for a while until the *BING* happens and I dive for the pattern book and knit my sweater, um, WB's sweater, in earnest.

The second set of swatches is for an office-use cardigan, made with Brown Sheep's Cotton Fleece. It is a combination of cotton (for lightness) and wool (for stretch-back-into-shape-ness) that I've always envisioned as that project. And I happened to buy some at Earth Guild a couple of summers ago, helping with The Tiny House (the blog is to the right where you can read about more adventures with this building project in Asheville, NC) and treating myself to some nice yarn all for me. Knowing that cotton looooves to stretch out of shape and stay there, and knowing that I did not want to make a giant sack that I would then feel uncomfortable wearing, I decided to knit some rib patterns. Ribbing helps the garment pull back into shape (those k stitches want to ignore the p stitches and just want to love on each other), so I tried some variations on a theme to see how they would look. Results are below:


A classic 4 x 2 rib - really pulls together; perhaps too much of a good thing??


Stockinette swatch. Yup, it's floppy.


5 x 1 swatch. It looks . . . something ain't quite right here.


4 x 1 swatch. It looks more balanced and, well, subtle.

So I'll probably go with this final swatch, the 4 x 1 swatch, with a contrasting color to be the border. I've also learned that on a cardigan the button band (i.e., the border) needs to be knit in a garter stitch (knit every row, like on the edges) and that's just too bland for me. The yarn is very simple; all the detail will be in the colors and the stitches. I want to use a seed stitch, and just have a single large, probably hand-made button at the top of the sweater, to button it near the neck. After all, who buttons cardigans all the way up? And since it will be a little floppier being open like that all the way down, the idea of a ribbed pattern appeals to me, especially a rib pattern where I can gather it along the waistline to pull in the garment and limit the floppiness. I have some great floppy pullovers that I happily wear at home and, yes, at the office on cold winter days, and I think something a little more tailored would suit me well.

Well, off to make some soup with some delicious purple barley I found at the local Farmer's Market, and maybe a salad to go with. Mmmmm . . . .